Saturday, October 27, 2012


How to Create a Logo With Microsoft Publisher 2010

Although logos appear everywhere from cereal boxes to toilet paper, creating one is an involved process. Logos can capture attention, communicate reputation and even directly contribute to an organization's success or failure. But logo creators aren't alone in the design process. Microsoft Publisher 2010 offers a range of logo design features, from sketching to in-program artwork to a paste board-like workspace, to assist you in your logo creation.

Instructions

    • 1
      Open "Microsoft Publisher." Click the "Blank 8.5 x 11" button in the top left of the "Available Templates" screen. Change the workspace to the preferred logo size by clicking the "Page Design" tab, clicking the "Size" button below the tab and choosing a new page size. Publisher will automatically resize and zoom in the work area.
    • 2
      Click the "Insert" tab at the top of the work area. Click the "Shapes" button below the tab. Choose a shape from the fly-out menu to start the base of the logo, such as a star.
    • 3
      Click and drag the mouse, then release and the shape appears on the logo area. Use the options in the new orange "Shape Tools" tab at the top of the work area to give the shape a border or fill color to match the organization's color choices.
    • 4
      Click the "Shapes" button again, and select the "Scribble" tool, which looks like a squiggly line in the "Line" section. Click and drag the mouse to draw any shape not listed in the "Shapes" menu or to draw artistic elements such as swirls.
    • 5
      Click the "WordArt" button, which looks like a tilted letter "A." Choose a WordArt style for the wording in the logo, such as steel or chrome. Type the company name, tag line, slogan or other information and click "OK." Drag the WordArt below or above the logo artwork.
    • 6
      Add a picture to the logo by clicking the "Clip Art" button on the toolbar. Type a word that goes with the organization into the "Search For" box. Click "Go." Scroll through the images, and double-click one to add it to the logo. Drag it into place. Resize it as necessary by clicking the image, pressing the "Shift" key and dragging a corner of the image.
    • 7
      Click the "File" tab. Click "Save As." Type a name for the logo. Pull down the "Save as Type" menu and click "GIF," the only format supporting transparency so that the logo may be placed on any colored background. Click the "Save" button.


Friday, October 19, 2012

How to Draw Tables in a Word 2010 Document

A table is an element you insert into your document, so Word 2010’s Table commands are found on the Ribbon’s Insert tab, in the aptly-named Tables group. Word comes with an assortment of predefined, formatted tables. Plopping one down in your document is as easy as using the Quick Tables submenu, chosen from the Table menu on the Insert tab.
Feeling artistic? For a more freeform approach to table creation, you can use a special drawing mode to create a table in your document:
1

Click the Table button on the Insert tab and choose Draw Table from the menu that appears.

The insertion pointer changes to a pencil (the "pencil pointer").
2

Click in your document and drag to “draw” the table’s outline.

Start in the upper-left corner of where you envision your table and drag to the lower right corner, which tells Word where to insert your table. You see an outline of the table while you drag down and to the right.
3

To draw a row, drag the pencil pointer from the left side to the right side of the table.

As long as the mouse pointer looks like a pencil, you can use it to draw the rows and columns in your table.
4

To draw a column, drag the pencil pointer from the top to the bottom of the table.

You can split columns or rows into more cells by simply dragging the pencil pointer inside a cell and not across the entire table.
5

Click the Draw Table button or press the Esc key when you're done creating the table's columns and rows.

The mouse pointer returns to normal. You can begin putting text in the table.
6

To draw more lines in a table, click the Draw Table button in the Design tab's Draw Borders group.

The table you modify need not be created by the Draw Table command, either; any table can be modified by using that tool.

Friday, October 12, 2012

How to Insert Special Characters and Symbols in Word 2010

Word 2010 lets you sprinkle characters beyond the keyboard's 26 letters of the alphabet, numbers, a smattering of symbols, and punctuation thingies. For example, Word provides foreign language letters and symbols — all sorts of fun stuff. You can insert a special character or symbol in your document in a couple of ways:
  • The Symbol menu: Click the Symbol command button in the Symbol group on the Insert tab. A list of some popular or recently used symbols appears. Selecting a symbol from the menu inserts the special symbol directly into your text (where you currently have the insertion pointer), just like you insert any other character.
    image0.jpg
  • The Symbol dialog box: Choosing More Symbols from the Symbol menu displays the Symbol dialog box. Choose a decorative font, such as Wingdings, from the Font menu to see strange and unusual characters. To see the gamut of what's possible with normal text, select (Normal Text) from the Font drop-down list. Use the Subset drop-down list to see even more symbols and such.
    image1.jpg
    To stick a character into your document from the Symbol dialog box, select the symbol and click the Insert button. Click the Cancel button when you're done using the Symbol dialog box.
  • The symbol's code: You can insert symbols by typing the symbol’s code and then pressing the Alt+X key combination. For example, the code for the sigma character is 2211: Type 2211 in your document and then press Alt+X. The number 2211 is magically transformed into the sigma character. A quick Web search will produce a resource with a list of symbols and their corresponding codes.
Some symbols have shortcut keys. They appear at the bottom of the Symbol dialog box. For example, the shortcut for the degree symbol is Ctrl+@, spacebar — press Ctrl+@ (actually, Ctrl+Shift+2), and then type a space.

Thursday, October 4, 2012

Formatting Style

How to Use a Formatting Style in Word 2010

In Word 2010, a style is nothing more than a clutch of text and paragraph formats. You give the style a name, and then you use it to format your text in a Word document:
 

1. In your document, select the text you want to format.

You can select text in a number of ways. For example, click-and-drag over the text you want to select.
 

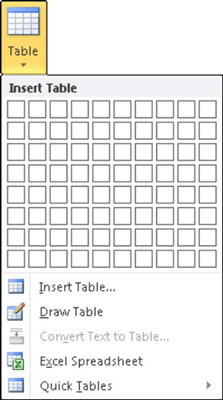
2. In the lower-right corner of the Styles group on the Home tab, click the dialog box launcher.

Alternatively, you can use the keyboard shortcut Ctrl+Shift+Alt+S. (It helps to be quite dexterous with your left hand to conjure up that shortcut.) The Styles task pane opens.
 

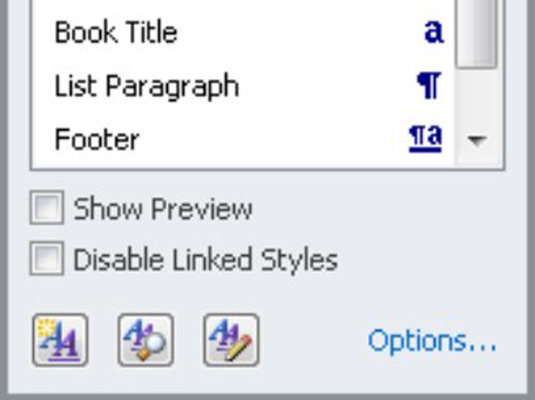
3. Click the Options link in the lower right corner of the Styles task pane.

The Styles Pane Options dialog box opens.
 

4. Select the option All Styles from the Select Styles to Show drop-down list.

Or, if you want to keep the list shorter, choose the option In Use or In Current Document.
 

5. Click OK.

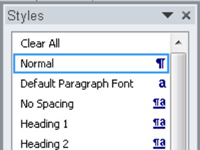
If you chose the All Styles option, the Styles task pane is updated to list every dang doodle style available in Word. It has quite a few of them.
 

6. Select a style from the Styles task pane.

After you choose a style, your document’s text is reformatted to reflect that style. That style is applied to the selected text.
 

7. To dismiss the Styles task pane, click the X (Close) button in its upper-right corner.

The Styles task pane disappears.
Styles can be applied by using a keyboard shortcut. For example, the Normal style shortcut key is Ctrl+Shift+N. (Not all styles have keyboard shortcuts, however.) You can also choose a new style and then just start typing; the new style affects the new text you type.